A: Your course won't show up until the instructor makes it active. When the course is made active, you will be shown the course date when it starts. Learners will be able to access the course after the course start date.
NOTE: Some instructors choose not to use D2L. Be sure to check with your instructor regarding where to find course content.
A: Users can pin and unpin courses as desired and use the tabs to display all courses or only pinned courses.
Change the order of your pinned courses: If you want to completely change the order in which your courses are displayed, unpin all your courses and then pin them in the order of how you want them to appear in the My Courses widget. The course that is pinned first will appear first.
A: D2L is on a secure server. If you are linking to a non-secure website, the content may be blocked by the browser. Try opening the link in a new window.
A: Make certain your course is active and has the correct date restrictions.
- From My Home, select your course.
- Click the Course Admin.
- Click Course Offering Information.
- Under the Active section, check the box to the left of Course is active.
- Under the Start Date section, check the box Course has start date. Enter the desired course start date and time.
- Under the End Date section, check the box Course has end date. Enter the desired course end date and time.
- Click Save.
A: Students view Assignment feedback from the Assignments area and from Grades.
- On the Assignments list page, click to view the results in the Feedback column.
- View Score, Feedback, and Rubric assessment information (if provided).
- Click Download All Files to download feedback attachments (if provided).
- When finished viewing feedback, click Done.
- The text entered by the instructor in the feedback area also appears as a comment for the grade item if connected to the gradebook.
A: Discussion Forums in D2L serve as a category for grouping Discussion Topics (i.e., Weekly Discussions). Topics are the actual discussion areas for new threads and replies. You cannot post to a Forum. Forums are useful because settings made at the Forum level apply to all Topics contained within. You can also hide (collapse) or show (expand) Topics for managing your view.
A: You can send an email to the entire class from within the course Classlist. Go to Communications > Classlist > Email Classlist. Click Send Email to compose your message and click Send at the top when done. Optionally, use Communications > Classlist > select checkbox by students and click the Email icon/link above the list.
A: When you are using the Address Book, you need to:
- Select the user name(s).
- Click on the appropriate field (To, Cc, or Bcc).
- Click Add Recipients.
Step 2 is often missed and there may be a lag before the name(s) populate the field. When not using the Address Book, you can directly enter their names or email address into the To field and select from the choices provided. To expand the Cc and Bcc fields, click Add CC or BCC.
A: You may have messages filtered to a specific course rather than showing all messages. When you are in a course and then click on the email link, the messages filter to that course. Use the "Filter By" pull down menu and select "All Messages" to see all email. Use the "settings" link (upper right) to configure options such as tracking activity for sent messages and forwarding email.
If you do not see an expected email in "All Messages," contact your instructor. See the Known Issues page for status updates on any current problems or fixes with D2L email.
A: Instructors (course editors) can add existing users to their course Classlist.
Go to Communication > Classlist > Add Participants (dropdown) > Add existing users, enter an MSUNet ID or other identifier in the search field and click the magnifying glass icon. From the search results, check the box next to the user, assign a role, and click "Enroll Selected Users." Check the box at the top to "Send enrollment email" after getting the search results and before clicking "Enroll Selected Users."
A: You can temporarily switch your role from your personal menu.
- Click the personal menu on the minibar (down arrow by name).
- Do one of the following:
- Click Change to select a temporary role from the list that appears.
- Click View as [role]. This link defaults to the highest sorted role that you have permission to switch to and will remember your last choice.
- To end a role switch, select the personal menu and click the x by Viewing as [role].
You can also impersonate the DemoStudent to mimic a student. This allows you to bypass course access restrictions and view/test connected grade activities in the gradebook. Each course is created with a unique DemoStudent in the Classlist. The Impersonate option allows you to view the course just as a student would. You can take quizzes, check date restrictions, populate the gradebook to check things out, and so on. When you are done, you can Restore yourself back to your own role.
Quick Steps:
- From your course, go to Communication > Classlist.
- Navigate to Demo Student and click the drop down to the right of the name.
- Select Impersonate.
- Click Yes. This suspends your current session and logs you in as the selected user. You will see an indication of the role in the minibar at the top.
- To return to your normal role, click on the impersonating icon in the minibar and click the "x" to stop impersonating.
A: By default, the overall grade is not displayed to students (only individual grades are displayed). To display the overall or final calculated grade, use the pull-down menu next to "Final Calculated Grade" and select "Enter Grades." Then use the pull-down at the top next to the title Final Grades and select "Release All." An open eye icon will appear next to grades to indicate that students can see their final grade in their grades list.
A: Create a new module
- Click the Content tab.
- Enter your new module title in the Add a module... field, which is below the Table of Contents title and any existing modules.
- Press Enter or click outside the field to add the module.
Create a new sub-module
- Click on the module you want to add a sub-module to from the left panel.
- On the right, enter your new sub-module title in the Add a sub-module... field at the bottom of the page.
- Press Enter or click outside the field to add the sub-module.
Delete a module
- Click on the module from the left panel.
- On the right, use the pull down next to the module title at the top and select Delete Module.
A: The D2L gradebook contains your grading system, grade calculations, grade scheme, grade items, and view and display options. Consider:
- Which grading system is most appropriate for your course.
- What grade items you plan to evaluate.
- How you will allocate points or weights across grade items.
- Which grade items you will associate with course objects.
- How you want to calculate final grade.
The simplest way to begin is to use the Gradebook Setup Wizard and follow the steps there. It should direct you to the questions you need to answer if you have not already done so.
See Gradebook Tips and Gradebook Extra Credit for more help with setting up a gradebook.
A: Beyond checking the items as bonus, the instructor also needs to check the "Can exceed" box for both the category and the Final Calculated Grade as well.
To do this, go to Assessments > Grades and from Manage Grades, select all and bulk edit. From there you will see the "Can exceed" boxes that need to be checked to allow bonus points to exceed both the category and the final calculated grade max score.
A: The default submission view will appear to users after they submit a quiz. By default, only the date of submission and score are made available. The default view and/or additional views can be changed in the quiz settings.
- Go to Assessments > Quizzes > (Edit Quiz) > Evaluation & Feedback menu
- Click on "Customize Quiz Results Displays"
- Click "Edit View" to customize the submission view
- Select new settings and Update
- Save and Close quiz settings.
D2L will display the most current submission view based on the given date. Create an additional submission view to turn off details after a specified date (i.e., create an additional view to start showing questions and answers and another view at a later date to stop showing questions and answers).
A: Students may click on their attempt in the quiz submissions area to view results.
Go to Assessments > Quizzes and click on the feedback icon or select Submissions from the pull down menu of the quiz you want to view, then click on the attempt. The instructor controls what information is released to the student in this location. By default, only the date of submission and score are made available.
A: Single sign-on. Clear browser cache, close all browser windows, then relaunch it. Or, try another browser.
A: Find more information on the Web Accessibility website: https://webaccess.msu.edu/
A: Here are some tips for keeping your course size under control:
Keep only active content: You may find greater peace of mind by uncluttering your course. Try to keep only the content you are using in a semester course and place content you might use later in a dev course or save it outside of D2L.
Ditch past CMS baggage: The Manage Files area of your course may be carrying extra baggage from previous conversions or years of accumulated files. This can affect the speed of your course copy and make it hard to find items. It is not necessary to keep copying these unused files year after year. The process below will show you how to clean these out in one fell swoop.
Store video files in MediaSpace: There are several reasons to save video files in Kaltura MediaSpace and link them in D2L. It avoids duplication if you use them in more than one course. It makes your course copy faster and less prone to errors. It may be easier to manage them and you can order free captions!
Resources and Tools
Clean Course Copy: This process copies all associated files from content and activities, such as quizzes and assignments, leaving behind any lingering files not actually used in the course.
- Start in an empty course site (new dev course or new semester).
- Go to Course Admin > Import/Export/Copy Components.
- Search for the course offering (to copy from).
- Choose Select Components.
- Check the box to Select All Components.
- De-select Course Files (associated files will still copy).
- Click Continue and Finish.
- Check the content in the new site.
Note: Files associated with Custom Widgets and Themes are not included.
What is contributing to course size?
- Go to Course Admin > Manage Files.
- Click twice on the "Size" column to order the list from largest to smallest (anything in KB is small and over 10 MB is large).
- If the Manage Files area contains multiple folders, you will need to look in each folder separately.
If you use the clean course copy process above, look at the number of files cleaned up by comparing the numbers at the bottom of the Manage Files area.
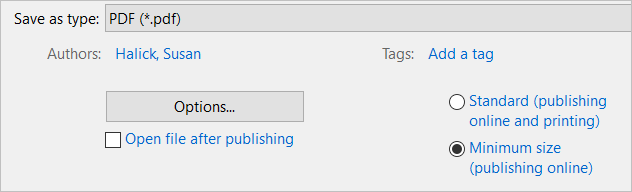
A: HTML files or Word documents are preferred.
Saving PowerPoints as PDFs with the option to minimize size is also recommended.
NOTE: Additional information is available in the following: